Payment Options
For: Coaches, Team Admins
The Payment Options page is your starting point for paying registration fees. It shows every event level your teams are associated with and lets you select teams to include on a new invoice.
Finding the Payment Options Page
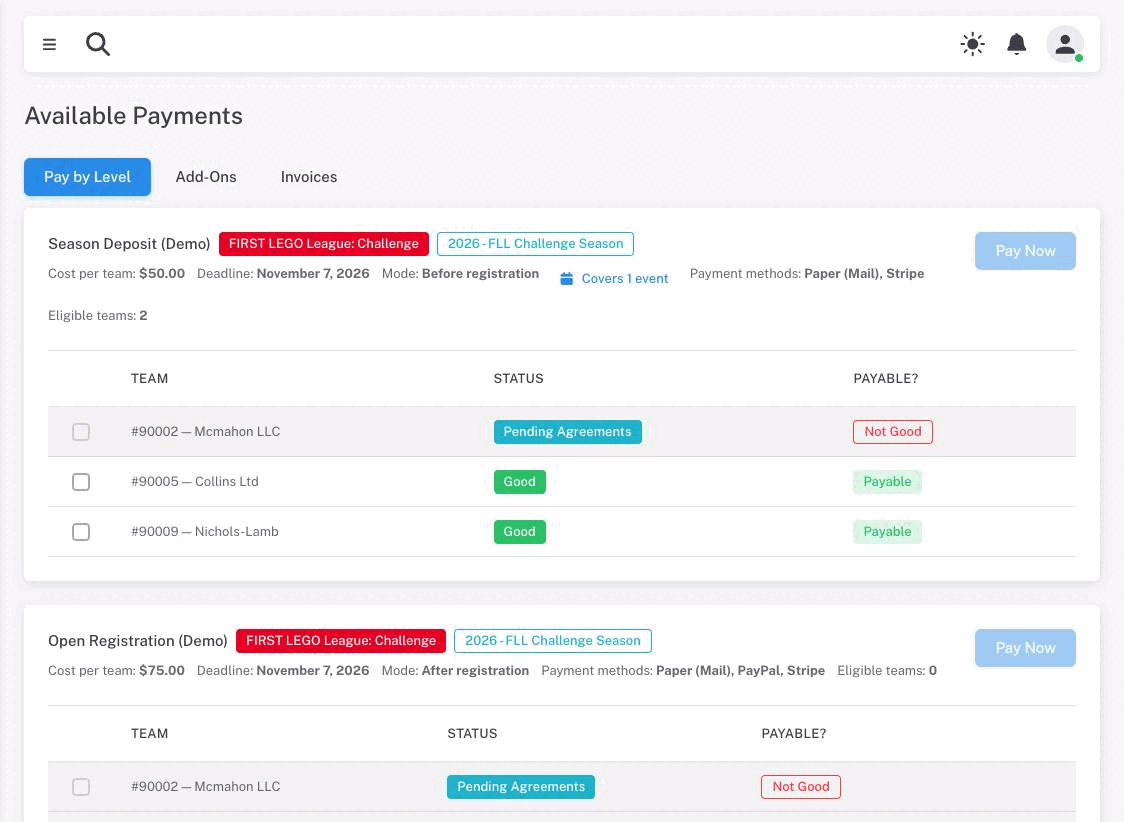
Navigate to Payments in the sidebar. The page is headed Available Payments and opens on the Pay by Level tab. Two further tabs sit alongside it: Add-Ons, for extras offered by an event host or by your region, and Invoices, which lists every invoice you have created.
Available Payment Methods
Your region controls which payment methods are available. The methods you may see listed on a level card include:
| Method | Description |
|---|---|
| PayPal | Pay online immediately through the PayPal checkout flow |
| Custom Portal | Your region uses its own external payment site |
| Paper (Mail) | Mail a check or money order to your region |
| Stripe | Pay online by card via Stripe checkout |
| Yoco | Online card payment (primarily South Africa) |
| EFT / Bank Transfer | Direct bank transfer; may require uploading proof of payment |
The active methods for each level are shown in the level card header.
Reading the Level Card
Each level appears as a card with the following details in the header:
- Level name and program/season badges
- Cost per team — the fee charged per team on the invoice
- Payment deadline — the date by which payment should be received
- Payment mode — whether payment is collected before or after event registration
- Registrations per payment — how many event registrations a single payment covers (shown when greater than 1)
- Payment methods — which methods are accepted
- Eligible teams — the count of your teams that can be paid right now
Below the header is a table listing each of your teams. The Payable? column explains each team’s current state:
| Status | Meaning |
|---|---|
| Payable | This team can be selected and added to a new invoice |
| Paid in Invoice #N | The team already has a completed payment; click the button to view that invoice |
| Open Invoice #N | The team is already on a draft invoice you created; click to open it |
| On Invoice | Another user has this team on an invoice; contact that person to pay or cancel |
| Unused Payment | The team has a payment credit that will be applied to its next registration |
| Pending Registration | The team needs to register for an event in this level before it can be paid |
| Not Good | The team’s status is not “Good”; fix compliance issues before paying |
| Pay & Register on team page | This is a new team that has not been paid for yet. It cannot be paid from here — see Paying for a new team |
A team can also carry a Deadline Extended chip alongside any of the above. That means your region has pushed this team’s payment deadline out, but the payment is still owed — pay as soon as you can.
What the level card’s wording means
Three phrases on the level card trip people up:
- Mode: Before registration — you pay first, and the payment sits as a credit you spend when you register for an event in that level. After registration means the reverse: register first, then pay what is owed.
- Registrations per payment — how many event registrations one payment covers. If it says 2, one fee lets the team register for two events in that level before paying again.
- Unused payment — the team has paid for more registrations than it has actually used. The balance is not lost; it is applied automatically the next time the team registers in that level.
Selecting Teams and Creating an Invoice
- Check the box next to each team you want to include. You can click anywhere on a row to toggle the checkbox.
- Click Pay Now. A confirmation dialog appears showing the level, the fee per team, and the teams you selected.
- If your region has published payment policies, a View Payment Policies button appears in the dialog. Review them before proceeding.
- Click Confirm & Continue to create the invoice. You are taken to the new invoice page.
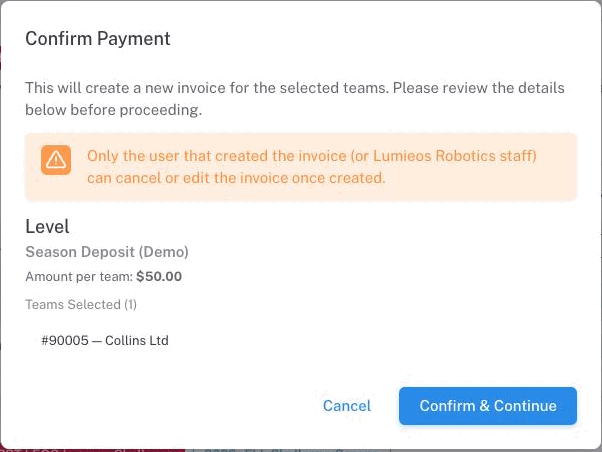
Note: Only the user who created an invoice (or regional staff) can cancel or edit it once it is created. If you need someone else to pay an invoice you created, copy the public URL from the invoice page and share it with them.
If a team is refused
Eligibility is re-checked when you confirm, so a team that looked payable a moment ago can still be turned down. The message names the reason — the team is already paid, already on someone else’s open invoice, needs an event registration first, pays through Pay & Register on its own team page, is not in Good standing, or is not eligible for this level.
The most common one is a team that is already on another person’s open invoice. A team can only be on one invoice at a time, so whoever created that invoice has to pay or cancel it before you can start a new one. The On Invoice tooltip names them.
Paying for a New Team
This applies only in regions that run team signups through Lumieos. If your teams come from FIRST registration, you will never see a draft team.
A team you created yourself starts as a Draft with no team number, and it cannot be paid for from the Payments page — the Payable column tells you so. Instead:
- Open the team from View My Teams.
- Click Pay & Register in the team header.
- Lumieos creates a Team Formation invoice and takes you straight to it.
That invoice can carry more than the signup fee. Depending on how your region has set things up it may also include an event registration for a bundled level, a physical item such as a challenge set, and a delivery charge for it. Where an item is bundled rather than charged separately, it appears at no cost and marked (Included).
Paying it does two things: your team is assigned its team number, and it stops being a draft. If a level was bundled, that level already shows as paid — you do not pay for it again.
Note: Clicking Pay & Register more than once does not create duplicate invoices. If an unpaid formation invoice already exists, you are simply taken back to it.
Warning: If your team stays as Draft - Pending Payment after you have paid, do not pay again. Contact your region partner — this can happen when the region’s block of team numbers has run out, and they need to widen it before your number can be assigned.
Buying Add-Ons
The Add-Ons tab lists events where extras are on sale — lunch pre-orders, extra medals, t-shirts and the like. Each row names the event, how many of your teams are eligible, and whether the add-ons are Collected by host or Collected by region.
Click Buy Add-Ons to open the purchase dialog:
- Teams — every team of yours registered for that event, pre-ticked. A team that is not in Good status shows a red Not Good chip and cannot be included.
- Add-Ons — switch on each item you want and set a Qty. Each item shows its unit price, and some have a minimum or maximum quantity.
- Total — the running total, which is the quantity you chose multiplied by the number of teams selected. The same selection is bought once for each team.
- Buy Add-Ons creates an invoice and takes you to it to pay.
Note: Add-ons always go on their own invoice, never onto a registration invoice. Host add-ons and region add-ons also cannot be combined — if an event offers both, buy them in two separate transactions.
There is no deadline of its own: add-ons stay on sale until the event itself is over or cancelled. Once you have placed the order you manage it like any other invoice — the dialog itself has no edit or cancel.
Donations
Some regions ask for a voluntary donation alongside registration fees. Where that is switched on, a dialog appears immediately after your invoice is created — before you reach the invoice itself. If your region does not collect donations you will never see it.
Reading the dialog
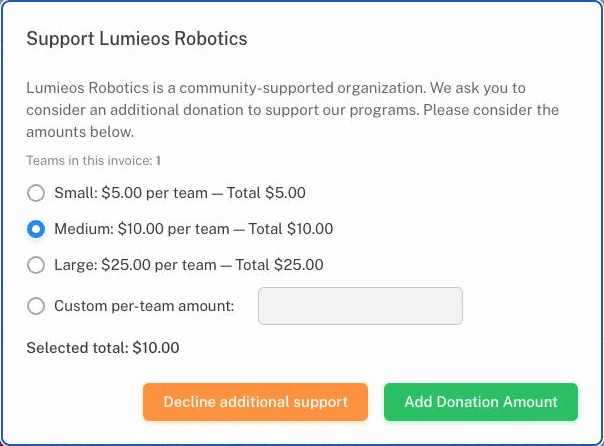
It is headed Support {your region}, and everything in it is priced per team:
- Teams in this invoice tells you how many teams the amount will be multiplied by.
- The three presets — Small, Medium and Large — show the per-team figure and the resulting total. On a three-team invoice, “Small: $5.00 per team” becomes a total of $15.00.
- Custom per-team amount takes your own figure — again per team, not in total.
- Selected total underneath updates as you choose, and is what will be added to the invoice.
One preset is already selected when the dialog opens. That is a default, not a commitment — nothing is added until you press a button.
Choosing
- Add Donation Amount adds a single donation line to the invoice and takes you to it.
- Decline additional support skips the donation and takes you to the same invoice.
Neither button charges anything by itself. A donation becomes part of the invoice total, so you pay it together with the registration fee in one transaction.
Note: Declining is not final. While the invoice is still in Draft you can add, change or remove the donation from the invoice page itself. Once you finalize, the total is fixed — changing it then means cancelling the invoice and creating a new one.
Tip: Paying for several teams at once? The presets are per team, so the total climbs with the number selected. To give a fixed amount overall, use Custom and divide by the team count shown at the top of the dialog.