Setting Up Payments
Payments are configured through a series of data models in Lumieos. This guide walks through creating payment provider configurations, setting up billing information, and connecting payment configurations to event levels so that event registration can collect fees.
Tip: Use the instance selector in the top navigation bar to personalize every admin URL on this page to your deployment. Until you pick one, URLs show a
<your instance>placeholder.
Step 1 — Create Partner Payment Configurations
Admin URL:
Partner Payment Configurations are reusable payment routings for each partner. You can have multiple configurations of each type, but only one of each type can be assigned to a specific Level Payment Configuration (covered in Step 3).
Supported types: Paper (Mail Check/Money Order), EFT / Bank Transfer, Custom Online Portal, PayPal, Stripe, and Yoco. For each configuration, fill in the type-specific values described below.
Note: The “Custom Metadata” field allows you to set up specific metadata for financial use. However, this cannot be tested in the sandbox environment.
Type-Specific Instructions
Paper Payments
| Field | Details |
|---|---|
| Paper Mailing Address | Include all components of the address, including attention line. |
| Paper Memo Instructions | There is no additional copy text in the UI, so be verbose. For example: “Please write your team number(s) in the memo field.” |
EFT / Bank Transfer
Use this type to print your banking details on the invoice so a payer can make a bank transfer. EFT is settled manually: the payer uploads proof of payment and a region admin marks the invoice as paid.
| Field | Details |
|---|---|
| Bank Name | The bank holding the account, e.g. Standard Bank. |
| Account Holder | The name the account is registered in. This is what the payer’s bank will check against. |
| Account Number | Required. |
| Branch Code | Required. |
| Account Type | Cheque / Current, Savings, or Transmission. Optional — leave unset if it does not apply. |
| Reference Instructions | What the payer should quote as the payment reference, e.g. “Use your team number as the reference.” When left blank, the invoice shows the invoice number as the reference. |
| Additional Instructions | Any further guidance shown alongside the banking details. |
Once created, attach the configuration to a Team Formation Configuration or a Level Payment Configuration (Step 3) for the details to appear on invoices.
Note: A Team Formation Configuration with only the older Enable EFT switch turned on still offers EFT and proof-of-payment upload, but shows no banking details. Attach an EFT configuration to show them.
Custom Portal
| Field | Details |
|---|---|
| Portal Fee | Listed in cents, not dollars. For example, enter 500 for $5.00. |
PayPal
Note: For some PayPal business accounts, API access might not be enabled by default. The user should log in to their PayPal account and check their profile settings under Account Settings > Website payments > API access to ensure it is active.
PayPal API Username, Password, and Signature:
- Go to PayPal API access settings
- Click NVP/SOAP Integration
- Select API Signature and submit
- Copy the Username, Password, and Signature values into Lumieos
PayPal Webhook ID:
- Go to PayPal Developer Dashboard
- Create a new application (name it “Lumieos”)
- At the bottom, click Create Webhook
- Open the PartnerPaymentConfiguration admin in Lumieos (see the Admin URL above — ) and copy the PayPal Webhook URL it displays for this configuration. Paste that URL into PayPal’s webhook form.
- Enable the Checkout and Dispute events
- Copy the Webhook ID value into Lumieos
Warning: When saving the API Username, Password, and Signature, Lumieos will attempt to validate the credentials. While the error only appears tagged to the “Username” field, it could mean that any of the three values are wrong. For security reasons, the API does not indicate which value is incorrect — it only reports that the combination is invalid.
Note: If you are having trouble saving these credentials, try regenerating them from PayPal. There have been cases where PayPal provides bad credentials.
Stripe
Stripe is used for online card payments via Stripe’s hosted checkout. Lumieos redirects the payer to Stripe and settles the invoice when the payment is confirmed — both when the payer returns to the invoice page and, as a backstop, when Stripe sends its webhook event.
You will need the following values from the Stripe Dashboard:
| Field | Where to get it | Notes |
|---|---|---|
| Stripe Secret Key | Dashboard → Developers → API keys | Starts with sk_live_... (or sk_test_... in sandbox). Treat as a password — never commit or share. Use the standard secret key, or a restricted key with Checkout Sessions: write and Webhook Endpoints: write permissions. |
| Stripe Publishable Key | Same page as the Secret Key | Optional — Lumieos’s hosted Checkout flow does not use it. |
Enter the Secret Key (and, optionally, the Publishable Key) in the Payment Configuration dialog and save. Lumieos registers the webhook endpoint with Stripe automatically using its API — there is no manual webhook setup step in the Stripe Dashboard.
Warning: When saving the configuration, Lumieos validates the secret key by calling Stripe and then registers the webhook. If validation or registration fails, double-check that you copied the full key. A test-mode key (
sk_test_...) registers a test-mode endpoint, so use a live key (sk_live_...) for a production instance.
Note: The provider list’s Check payment confirmations action reports whether Stripe still has the webhook endpoint enabled, and Re-register recreates it if it was disabled or deleted.
Yoco
Yoco is used for online card payments in South Africa. Lumieos redirects the user to Yoco’s hosted checkout and settles the invoice when Yoco sends the matching webhook event.
You will need the following values from the Yoco Business Dashboard:
| Field | Where to get it | Notes |
|---|---|---|
| Yoco Public Key | Dashboard → Sell Online → Integrations → Online Payments API | Starts with pk_live_... (or pk_test_... in sandbox). Safe to expose. |
| Yoco Secret Key | Same page as the Public Key | Starts with sk_live_... (or sk_test_...). Treat as a password — never commit or share. |
Enter both values in the Payment Configuration dialog and save. Lumieos will register the webhook with Yoco for you using its API — there is no manual webhook setup step.
Warning: When saving the configuration, Lumieos will validate the secret key by calling Yoco and then register the webhook. If validation or registration fails, double-check that you copied the full key and that you are using a live key for a production instance (sandbox keys will not work against live merchants).
Step 2 — Set Up Billing Information
Admin URL:
The organization information shown on invoices is configured on the FIRST Partner data model.
Billing Phone and Billing Email are shown on the invoice only if present.
Step 2a — Enable Donation Support (Optional)
On the same Partner admin page, you can enable donation support. This adds a donation workflow and line item to any invoice, regardless of payment backend.
Step 3 — Set Up Level Payment Configurations
Admin URL:
Where the Partner Payment Configurations from Step 1 hold your payment credentials and routing (your PayPal keys, your paper mailing address, and so on), a Level Payment Configuration sets the per-level pricing — the fee, the deadline, and which of those payment methods teams may use — and points at the provider configurations it needs. A Level Payment Configuration is then attached to one or more event levels (Step 4).
Manage them from Configuration → Commerce → Level Pricing (). Adding, editing, or removing a configuration requires partner administrator privileges; commerce managers without that privilege can open the list and view a configuration read-only. The Used by column shows how many levels currently share each configuration at a glance.
Note: Level Payment Configurations must be created each season.
Accepting payments before events are posted: pay-before-registration configurations offer an Accept payments before events are posted switch. With it on, coaches can pay as soon as the level and pricing exist — no events needed — and the payment is held as the usual pre-registration credit. Registration itself still requires events.
Creating or Editing a Configuration
- Open Configuration → Commerce → Level Pricing.
- Click Add Level Payment Configuration, or choose Edit from the actions menu on an existing row.
- Fill in the fields described below.
- Click Create (or Save).
Warning: A Level Payment Configuration can be shared by many levels and events. Editing one changes the pricing and payment options for every level and event that uses it — not just the one you opened it from. If you need different pricing for a particular level, create a separate configuration instead.
| Field | Details |
|---|---|
| Name | A label for this configuration. This is what you pick from when attaching a configuration to a level. |
| Registration fee | The amount charged per registration, in whole dollars (no cents). |
| Deadline | Optional. The date by which payment is due. |
| Payment timing | Collect payment before registration — teams pay first, then register. Collect payment after registration — teams register first, then pay. |
| Registrations per payment | How many event registrations a single payment covers (default 1). |
| Payment policies URL | Optional. A link to your refund/payment policy, surfaced to teams during checkout. |
| Hide pricing externally | When enabled, the fee is hidden from public-facing pages. |
| Payment methods | For each provider — Paper, Custom Portal, PayPal, Stripe, and Yoco — choose which Partner Payment Configuration (from Step 1) teams may pay through, or None to disable that method. Only providers that already have a matching Partner Payment Configuration can be selected; the others are disabled with a Manage payment configurations link back to Step 1. |
Note: If the Registration fee is 0, Payment timing must be set to Collect payment after registration — Lumieos will not save a free configuration that collects before registration.
Enabling Purchase Orders (PO Received)
Some teams — particularly those backed by a school or district — pay via a purchase order that is issued and mailed before the funds actually arrive. If you want to let those teams participate while their payment is still in flight, enable the Allow PO option on the Level Payment Configuration.
| Setting | Effect |
|---|---|
| Allow PO | When enabled (default is off), region administrators can mark an active invoice for this configuration as PO Received. The team is then treated as awaiting payment rather than unpaid, so it can register and participate before the money settles. You mark the invoice paid manually once payment arrives. |
Leave Allow PO off for configurations where every team is expected to pay before participating. See Purchase Orders (PO Received) under Managing Invoices for the day-to-day workflow.
Removing a Configuration
Choose Delete from the actions menu on a configuration. Because a configuration can be tied to real money and live registrations, Lumieos blocks the deletion while it is still in use — you must clear the references first:
- Attached to one or more levels — detach it from every level that uses it first. Lumieos lists the affected levels so you know where to look.
- Referenced by a discount coupon — remove it from any coupon that targets it.
- Referenced by existing invoices — a configuration that has already been billed on an invoice cannot be deleted at all.
Note: A few advanced options are not part of the Level Pricing editor — for example the extra purchasable items that can be added to a configuration’s invoices — and remain on the Level Payment Configuration in the Django admin ().
Step 4 — Set Up Event Levels
Admin URL:
Once payment configurations are complete, attach them to levels for the season. Payment configurations are required for events to appear in the event registration flow — they are what connect payments to the front end.
When you edit a level and set its Level Payment Configuration, the level editor links straight to the Level Pricing tab (Step 3) so you can add a new configuration without losing your place — a configuration you create there is immediately available to select on the level.
Host-Collected Commerce (Optional)
By default, commerce is partner-collected — everything above routes payment to your own Partner Payment Configurations. Lumieos also supports an opt-in host-collected mode where the event host collects registration payments directly instead of your region.
In host-collected mode:
- The event host sets up their own payee, payment methods, and invoice branding from the Configuration and Invoices tabs in their event-manage area.
- Teams pay the host directly, off-platform — mailed check, EFT/bank transfer, or a link to the host’s own external payment page.
- The host marks their own invoices paid once they’ve received payment.
- Host-collected invoices display the host’s logo, name, and payee details — not your region’s.
- The fee is still set by you, on the Level Payment Configuration (Step 3 above). The host controls who to pay and how, not how much.
- Your discount codes and automatic discounts do not apply to a host-collected invoice. That money goes to the host, so a discount your region offers cannot reduce it — a team entering a code on one is told so.
Note: Host-collected mode currently supports manual payment methods only (mailed check, EFT/bank transfer, and a link to the host’s own external payment page). Integrated online card processing for hosts is not yet available.
Enabling Host-Collected Mode
- Open Region Management → Configuration → Commerce → Level Pricing, then Add or Edit the target Level Payment Configuration.
- Set Payment timing to Collect payment after registration. The Payments collected by event host switch stays disabled until this is chosen — host-collected mode cannot be enabled on a pre-registration configuration, and the API rejects the change if you try to force it.
- Turn on Payments collected by event host.
- Click Save.
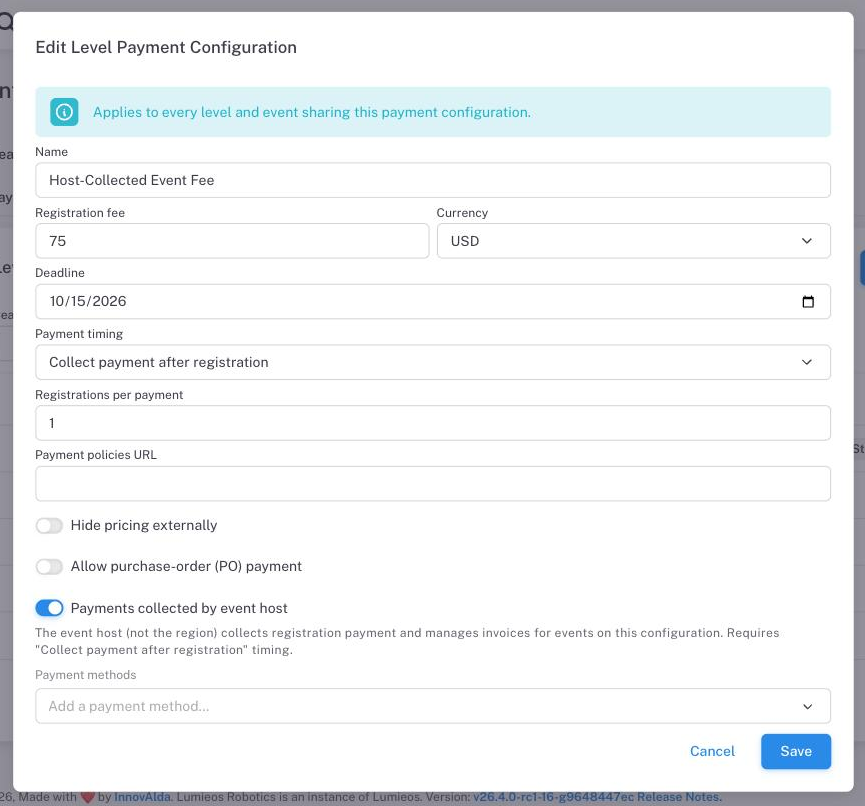
Warning: The switch applies to the payment configuration, not just one level — it takes effect for every level and event that shares that Level Payment Configuration. If multiple levels reuse the same configuration, enabling host-collected mode switches billing and collection to the event host for all of them.
Granting the Host Access
Enabling host-collected mode on the payment configuration does not by itself give anyone access to configure it. For each event, grant the intended host the Manage Commerce permission from the event’s Managers dialog — see Event Managers. This gives that user Configuration and Invoices tabs in their event-manage area, where they set up their payment methods and branding and mark their own invoices paid. See the Event Host guide for what the host sees there.
Team Formation Invoices (Default Invoice Pricing)
Admin URL: — Team Formation tab
Regions that use Lumieos for initial team creation configure the default invoice line items on the Team Formation Configuration. Every formation invoice is pre-populated from these settings, so this is where you set up your standard pricing — for example a team registration fee, a challenge set, and a shipment fee.
All amounts are entered in whole units of the configuration’s currency (e.g. Rand, no cents).
| Setting | Invoice result |
|---|---|
| Fee | The team formation/registration fee — the base line item on every formation invoice. |
| Bundled Event Registration + Display Fee | Optionally bundles an event registration with formation. Split mode shows it as its own line that adds to the total; Included mode shows it at 0 with an “(Included)” label. |
| Requires Shipping | Collects a shipping address from the team on the invoice page before it can be finalized. |
| Shipped Items + Display Fee | Names the physical items shipped with formation (e.g. “Challenge Set”) and prices them as their own line. Supports the same Split / Included fee modes. |
| Shipping Fee + Label | The courier/delivery cost (e.g. “Shipment”), itemized as its own line on the invoice. |
Note: Teams can opt out of shipped items while their invoice is in draft. Opting out removes both the shipped items line and the shipping fee line, and the shipping address is no longer required.
Managing Invoices
Partner Invoice Dashboard
The partner invoice dashboard allows region administrators to view all invoices across their region, submit payments, and see overall payment statistics.
Admin URL:
Note: A new permission (accessible from the Partner admin page) is required to access the invoice dashboard.
From the dashboard, you can:
- View all invoices and their current status
- Submit payments on behalf of users using the Submit Payment button
- See how invoices were paid, including payer name, check numbers, and transaction IDs
An Unreconciled Payments panel appears above the statistics whenever a payment provider confirmation needs a look — a payment that couldn’t be matched to an invoice, or one confirmed for the wrong amount or currency. Click Resolve on a row to review and match or dismiss it; resolved rows stay available behind the Show resolved toggle.
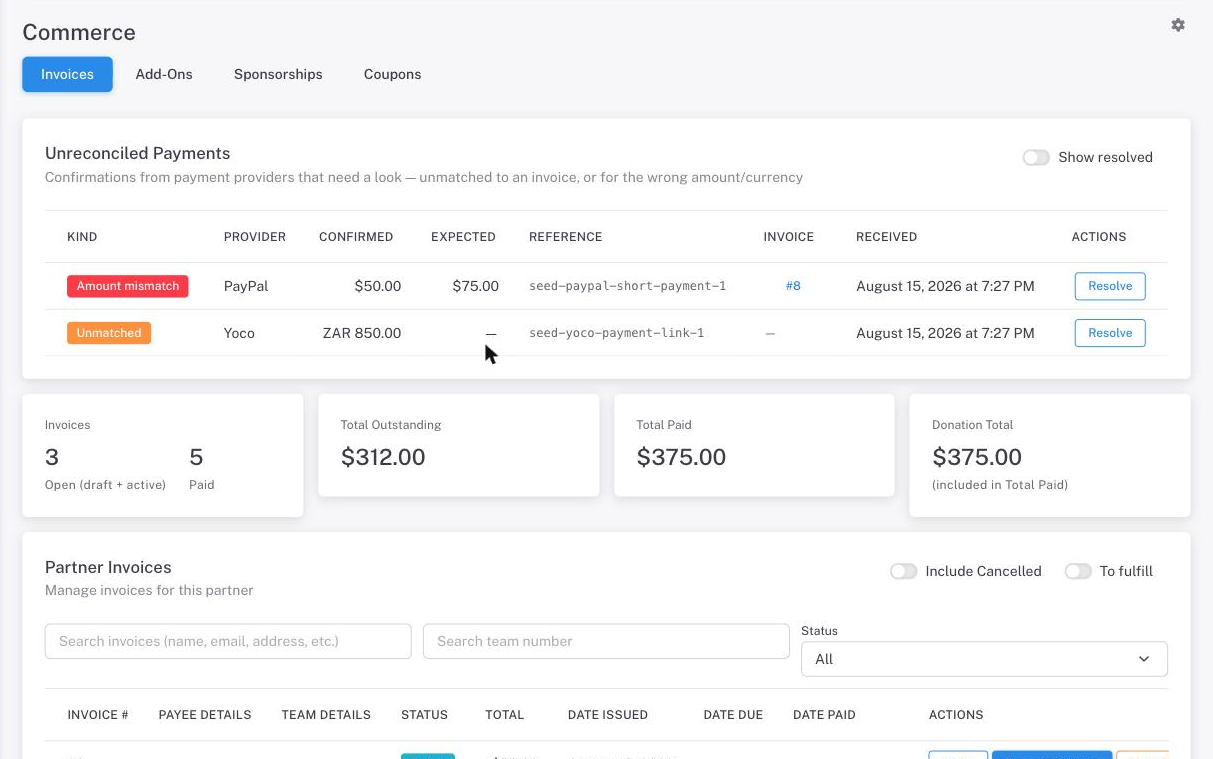
When a team pays by EFT and uploads proof of payment, the invoice detail page shows a Proof of payment uploaded notice with a View proof of payment link so you can check the file before marking the invoice paid. The invoice list flags the same invoices with a Proof uploaded badge, and the Awaiting EFT review filter narrows the list to just the invoices still waiting on that review.
Warning: When submitting a payment, the invoice creator and all users of all teams on the invoice will receive a notification.
Note: It is not currently possible to mark a general exempt status for invoices or teams. The PO Received workflow below is the supported way to let a team participate before payment settles, and it only applies to invoices backed by a purchase order.
Purchase Orders (PO Received)
When a team pays by purchase order, the funds often arrive well after the team needs to register and compete. The PO Received workflow lets you record the PO against an invoice and let the team participate immediately, while keeping the invoice in an unpaid state until payment actually settles.
Note: This workflow is only available when Allow PO is enabled on the invoice’s Level Payment Configuration (see Enabling Purchase Orders in Step 3). If it is not enabled, the Mark PO Received action does not appear.
Admin URL: Invoice detail page — → open the relevant invoice
Marking an Invoice PO Received
On an active invoice whose payment configuration allows purchase orders, a Mark PO Received button appears alongside the payment actions. Selecting it opens a dialog that asks for:
| Field | Details |
|---|---|
| PO Number | Required. The purchase order reference number from the team’s school or organization. |
| PO Document | Required. Upload a copy of the purchase order — a PDF or an image (PDF, PNG, JPG, JPEG, GIF, or BMP), up to 10 MB. |
Confirming the dialog moves the invoice into a distinct PO Received status and does the following:
- The team’s covered event registrations are treated as awaiting payment rather than unpaid, so the team is no longer flagged for missing payment and can register and participate.
- The invoice creator and the users on any team attached to the invoice receive a notification.
- The recorded PO number, the date it was received, and a link to the uploaded PO document are shown on the invoice detail page.
Important: A PO Received invoice is not counted as paid. Payment is still due, and the invoice continues to appear in your open/outstanding totals until you settle it.
Settling Payment
When the payment actually arrives, mark the invoice paid the same way you would any other invoice — use the Mark as Paid / Submit Payment action on the invoice. This moves the invoice from PO Received to Paid and clears the awaiting-payment flag from the team’s registrations.
Note: If the team instead completes an online payment (for example through PayPal) against a PO Received invoice, Lumieos reconciles it automatically — the incoming payment settles the invoice to Paid and clears the PO awaiting-payment flag without any manual step.
Reverting a Purchase Order
If a PO was recorded in error, use the Revert PO action on a PO Received invoice. This returns the invoice to the active (awaiting payment) state, clears the recorded PO number and document, and removes the awaiting-payment flag from the team’s registrations — restoring the normal unpaid behavior.
Impersonating the Payment Portal
Region administrators can impersonate users to view their payment portal and act on their behalf. This is accessible via the green impersonation button on the region team list.
The user’s payment portal includes a tabular view of all invoices on their account. Paid invoices are retained from prior seasons.
Extra Items & Coupons
- Extra Items — Additional purchasable items can be added to invoices beyond standard registration fees.
- Discount Coupons — Coupons apply discounts to invoices during the payment flow; see the next two sections.
Discount Coupons
Manage general discounts under Region Management > Commerce > Coupons (viewing requires the Commerce permission; creating or editing requires partner admin). Two types are available, chosen when the coupon is created:
- Discount codes — teams enter the code on their invoice while paying. Codes are unique within your region, and you can set an optional maximum number of uses; the table tracks redemptions against that limit.
- Automatic discounts — pre-applied with no code, either for all teams on the selected pricing or for a hand-picked list of teams. These work like sponsorships but appear as a plain discount line, without sponsor branding.
Every coupon sets a fixed amount or percentage off, the Level Pricing configurations it applies to, and optionally an expiration date and whether it also discounts extra items. An expiring automatic discount is a simple way to run an early-payment discount window.
Also applies to extra items decides how far a discount reaches. Left off, it discounts the registration fee only. Turned on, it also covers the add-ons bought alongside it — shirts, meals and the like — so a percentage comes off the whole of what the team owes rather than the fee alone. Add-on quantities in your reports are unaffected either way; the Total Billed column there is the list price before any discount.
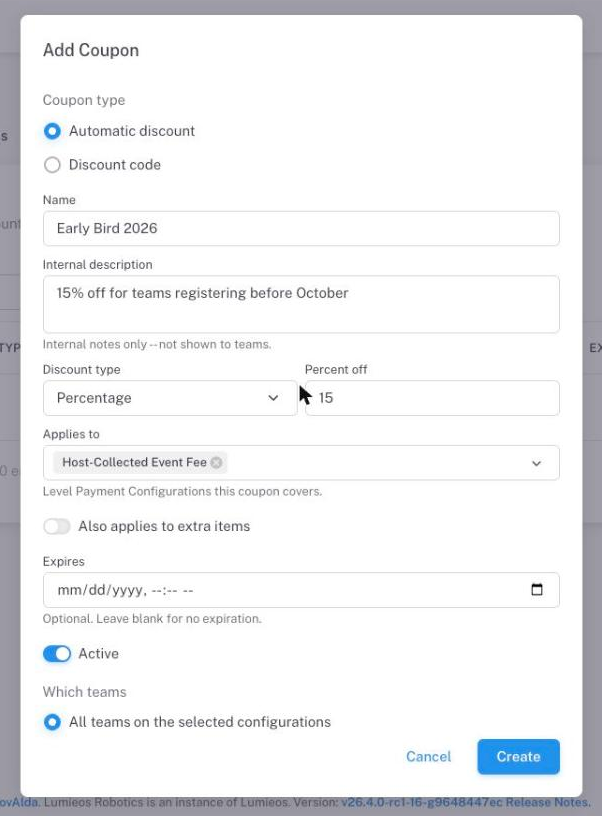
A coupon that has already been applied to invoices cannot be deleted — deactivate it instead to stop further use while keeping the invoice history intact.
Generating a batch of codes
When a sponsor agrees to cover a set number of team registrations, generate the codes in one go instead of creating them one at a time. Batches live in the Sponsorship Code Grants card at the top of Region Management > Commerce > Coupons. Viewing a grant, its codes, and its CSV requires the Commerce permission; generating, deactivating, or deleting one requires partner admin.
Click Generate Codes and fill in:
- Grant name — shown on invoices next to the code (e.g. “Acme Robotics Sponsorship”), plus an optional internal description that teams never see.
- Who gets a code — either Unassigned codes with a Number of codes (up to 1,000), or One code per team with the teams picked from a search. A per-team code is locked to that team from the start; an unassigned code locks to the first team that redeems it.
- Code prefix — optional letters and digits placed in front of the random part, so codes look like
ACME-K7MPX2Q9WD. The random part avoids easily confused characters (no 0/O or 1/I/L), so codes survive being read aloud or copied from a printout. - Discount type, amount, Applies to (Level Pricing configurations), Also applies to extra items, and Expires — the same settings as a single coupon. A fixed amount larger than the fee covers it in full.
Every code in a batch is single-use. Teams enter it on their invoice like any other discount code, with a few extra rules:
- A code locked to a team only discounts that team’s items.
- A team can hold one code per batch — a second code from the same grant is refused.
- Cancelling an invoice returns its code to the pool so it can be redeemed again. The team lock stays, so a locked code goes back to the same team rather than becoming available to others.
The grant table shows codes used/total, the discount, the pricing configurations, the expiry, and whether the grant is active. From the row actions you can View codes (each with its team and Available / Used / Inactive state), Download CSV (code, team number and name, amount, discount type, expiry, uses, active, redeeming invoice) to hand to the sponsor or mail to teams, Deactivate the whole grant — every unused code stops working until it is reactivated — or Delete a grant none of whose codes has been used.
Note: Batch codes are managed only through their grant — they do not appear in the general Coupons table below. A grant’s codes and discount cannot be changed after generation; deactivate it and generate a new one instead.
Sponsorship Coupons
Sponsorship coupons let a sponsor cover part (or all) of teams’ registration fees — and get credit for it on the invoice. Teams don’t enter a code: the discount is pre-applied automatically, and the invoice line reads “Sponsored by …” with the sponsor’s name and logo when one is uploaded.
Manage them under Region Management > Commerce > Sponsorships (viewing requires the Commerce permission; creating or editing requires partner admin):
- Click Add Sponsorship and enter the sponsor’s public name (shown to teams) and optionally upload their logo.
- Choose the discount — a fixed amount or a percentage. A discount can cover 100% of the fee; fully covered invoices are marked paid automatically.
- Select which Level Pricing configurations it applies to.
- Choose the scope — all teams paying those configurations, or a hand-picked list of teams.
The table shows each sponsorship’s total contributed to date and how many teams it has helped, counting only paid invoices.
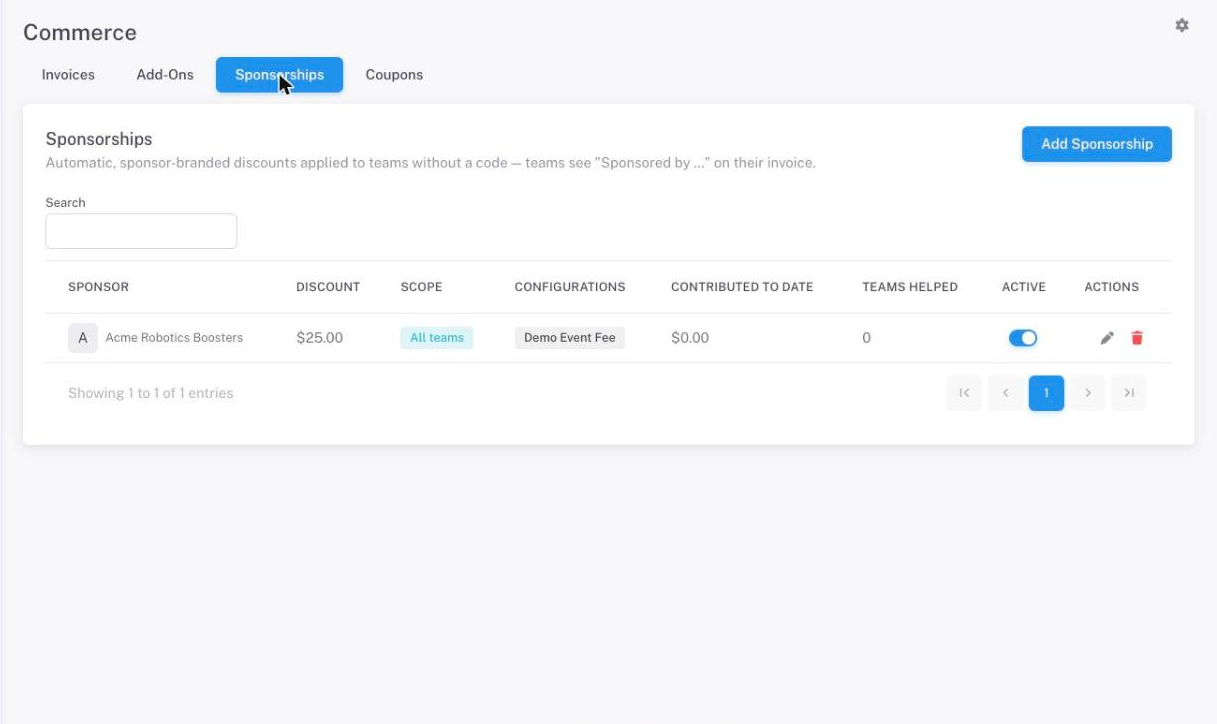
Note: Sponsorship discounts never apply to host-collected invoices — money collected by an event host is theirs, so partner-funded sponsorships only reduce fees the region collects itself.
Event Add-Ons
Add-ons (meals, shirts, medals) come in three flavors, and they can be used together:
Region add-ons — offered at registration time. The region defines an add-on once at the level scope from Commerce → Add-Ons, with the usual name/price/quantity rules, and chooses which events under the level show it (all events by default, or a selected list). Visible add-ons are offered on the team’s registration invoice: required ones are added automatically, optional ones appear in the invoice’s extras step. The region collects this money with the registration fee. An event needing different pricing gets its own add-on scoped to the right events. Region add-ons never apply to host-collected levels.
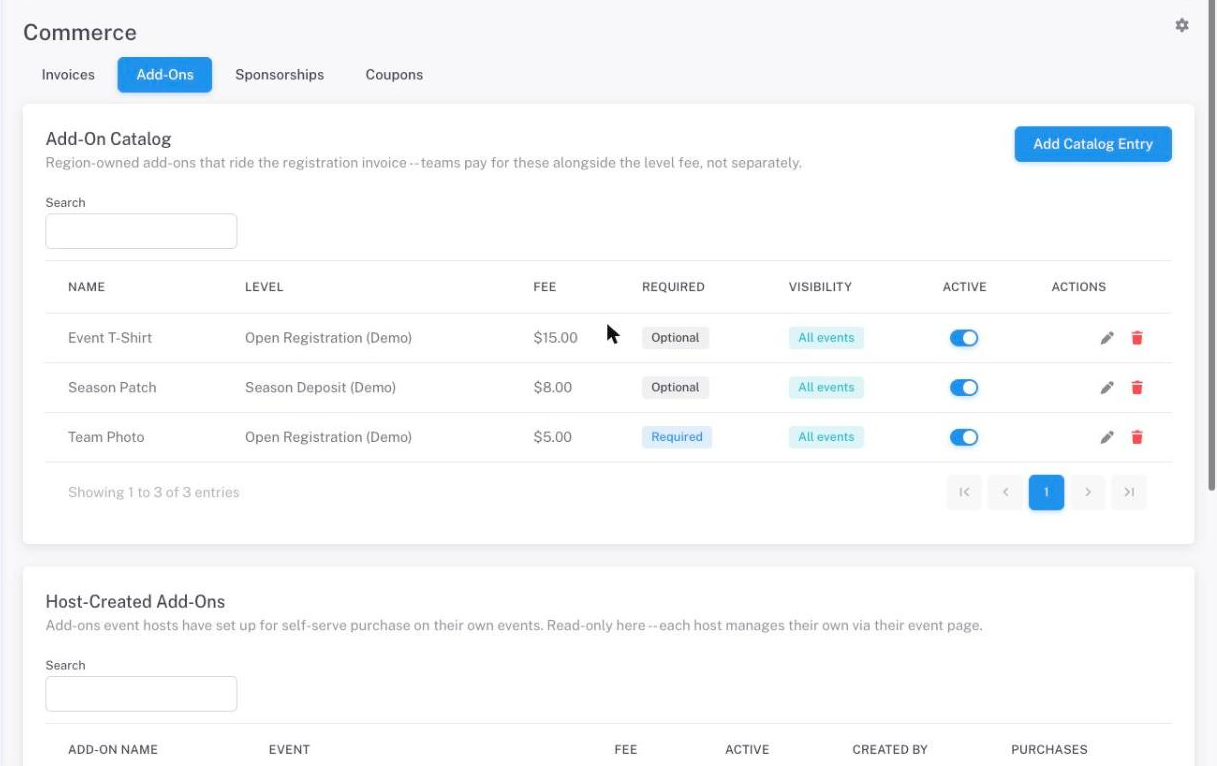
Region add-ons — sold after registration. A region add-on can instead be marked a post-registration purchase, which detaches it from the registration invoice entirely. Pick the events it appears on, and a team buys it whenever they like on its own invoice, collected through your region’s payment provider — never the host’s. This is what lets a region that collects payment before registration still sell add-ons afterwards, and it means one standard add-on set can cover several events without splitting them across levels. The up-front mode above keeps working alongside it; an add-on is one or the other.
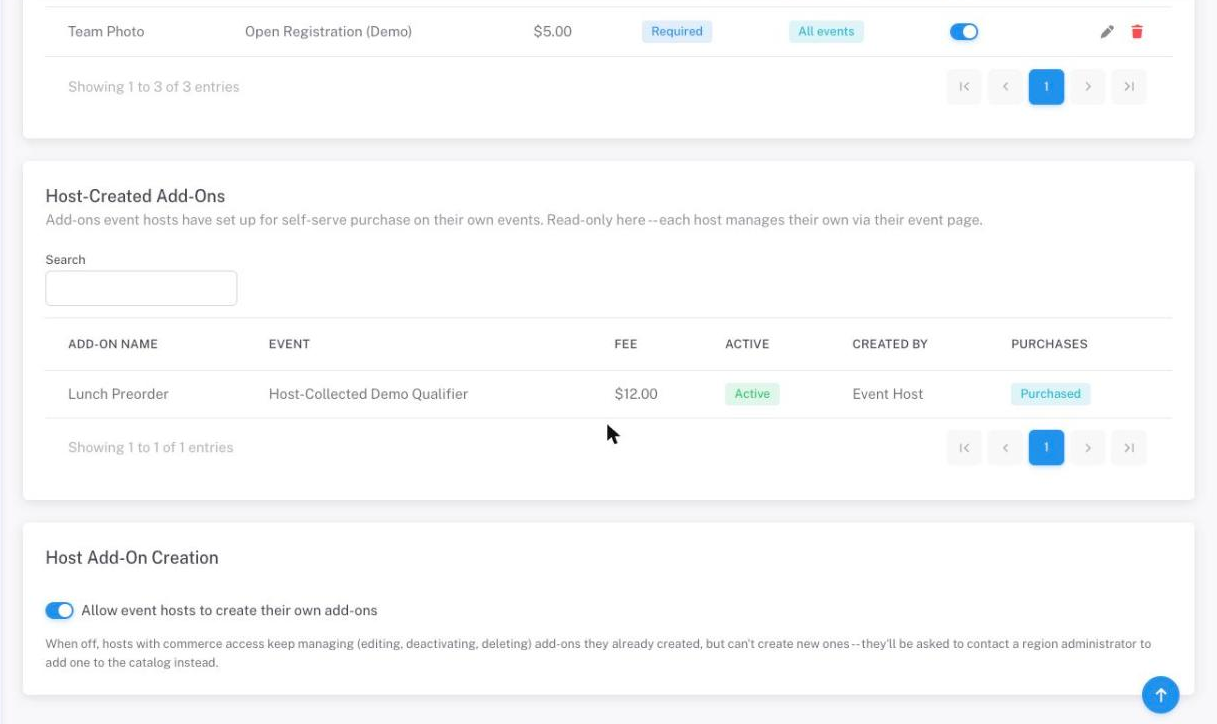
Host add-ons — purchased anytime, paid to the host. An event host with the Commerce permission gets an Add-Ons tab on their event’s management page to create add-ons for their event only. These are always purchased on their own separate invoice payable to the host (host payment methods and branding, host marks it paid) — never mixed onto a region-collected registration invoice — and teams can buy them at any time while the event is upcoming, even after registration is fully paid. Because there is no payment to attach a requirement to, host add-ons are always optional. Hosts can deactivate an add-on to stop new purchases (purchased add-ons can’t be deleted) and download a CSV of orders. Quantity limits apply per order, not per season.
Controlling host add-on creation. The Host Add-On Creation toggle at the bottom of the Add-Ons tab is a region-wide switch for whether event hosts can create their own add-ons. When it’s off, hosts with commerce access keep managing (editing, deactivating, deleting) add-ons they already created, but can’t create new ones — they’re asked to contact a region administrator to add one to the catalog instead. The same section lists every host-created add-on across your region, read-only, so you can see what hosts are selling.
How teams find them: required region add-ons are added automatically at payment; optional ones are in the invoice extras step; host add-ons appear both as an Add-Ons tab on the team’s Payments page and as an “Event add-ons available” prompt on the team’s page for that event.
Level-wide extra items (the older mechanism) continue to work unchanged alongside both.